My ZOO has turned TEN!!! Double digits!!! We had to celebrate his birthday in a big way. In his words, the party had to be “epic.” He wanted his friends to go ice skating with him but also wanted a sleepover. And it would be Harry Potter themed, of course! The ice skating portion wouldn’t be Harry Potter (though I tried to convince him they should all wear scarves of their houses), but once we got back to our house, it was all wizards and magic! Time for a Harry Potter birthday party!
I didn’t do a lot of decorations, but we did decorate the mantle, using mostly Harry Potter items we already owned. I had Zach build a little stand for all his Lego mini figures, we brought down the
Lego Hogwarts Express,
Brick Headz,
Whomping Willow and Quidditch hoops, a couple stuffed owls, and we own all the
illustrated copies of the books, so those alone make great decorations. Oh, and that
Tri Wizards cup! It is actually a lamp we found at Target, and we used that to put the boys’ names in to select teams for the games. More on that in a bit…
I only made two things for the mantle: the Happy Birthday banner and I painted a sign with Zach’s favorite quote, “I solemnly swear I am up to no good.” I bought an already-cut wood sign from Michael’s and used vinyl cut on my
Silhouette for the stencil. The font I used for both is called Harry P, though I added some embellishments to the birthday banner, like wings on the H and Y and used a feather for the I. I cut the letters out of black cardstock using my Silhouette and strung them on some string. If you don’t have time or don’t want to make your own banner,
this one is adorable.
Since we were going to spend most of our time for the games in the living room, we also decorated the ceiling with winged keys! It was quite simple to do and gave a fun ambiance. I found a set of
vintage looking keys on Amazon and cut some simple wings using my
Silhouette. I just hot glued the wings to the keys and hung them with fishing line. Those little guys were hard to photograph though!
THE FOOD
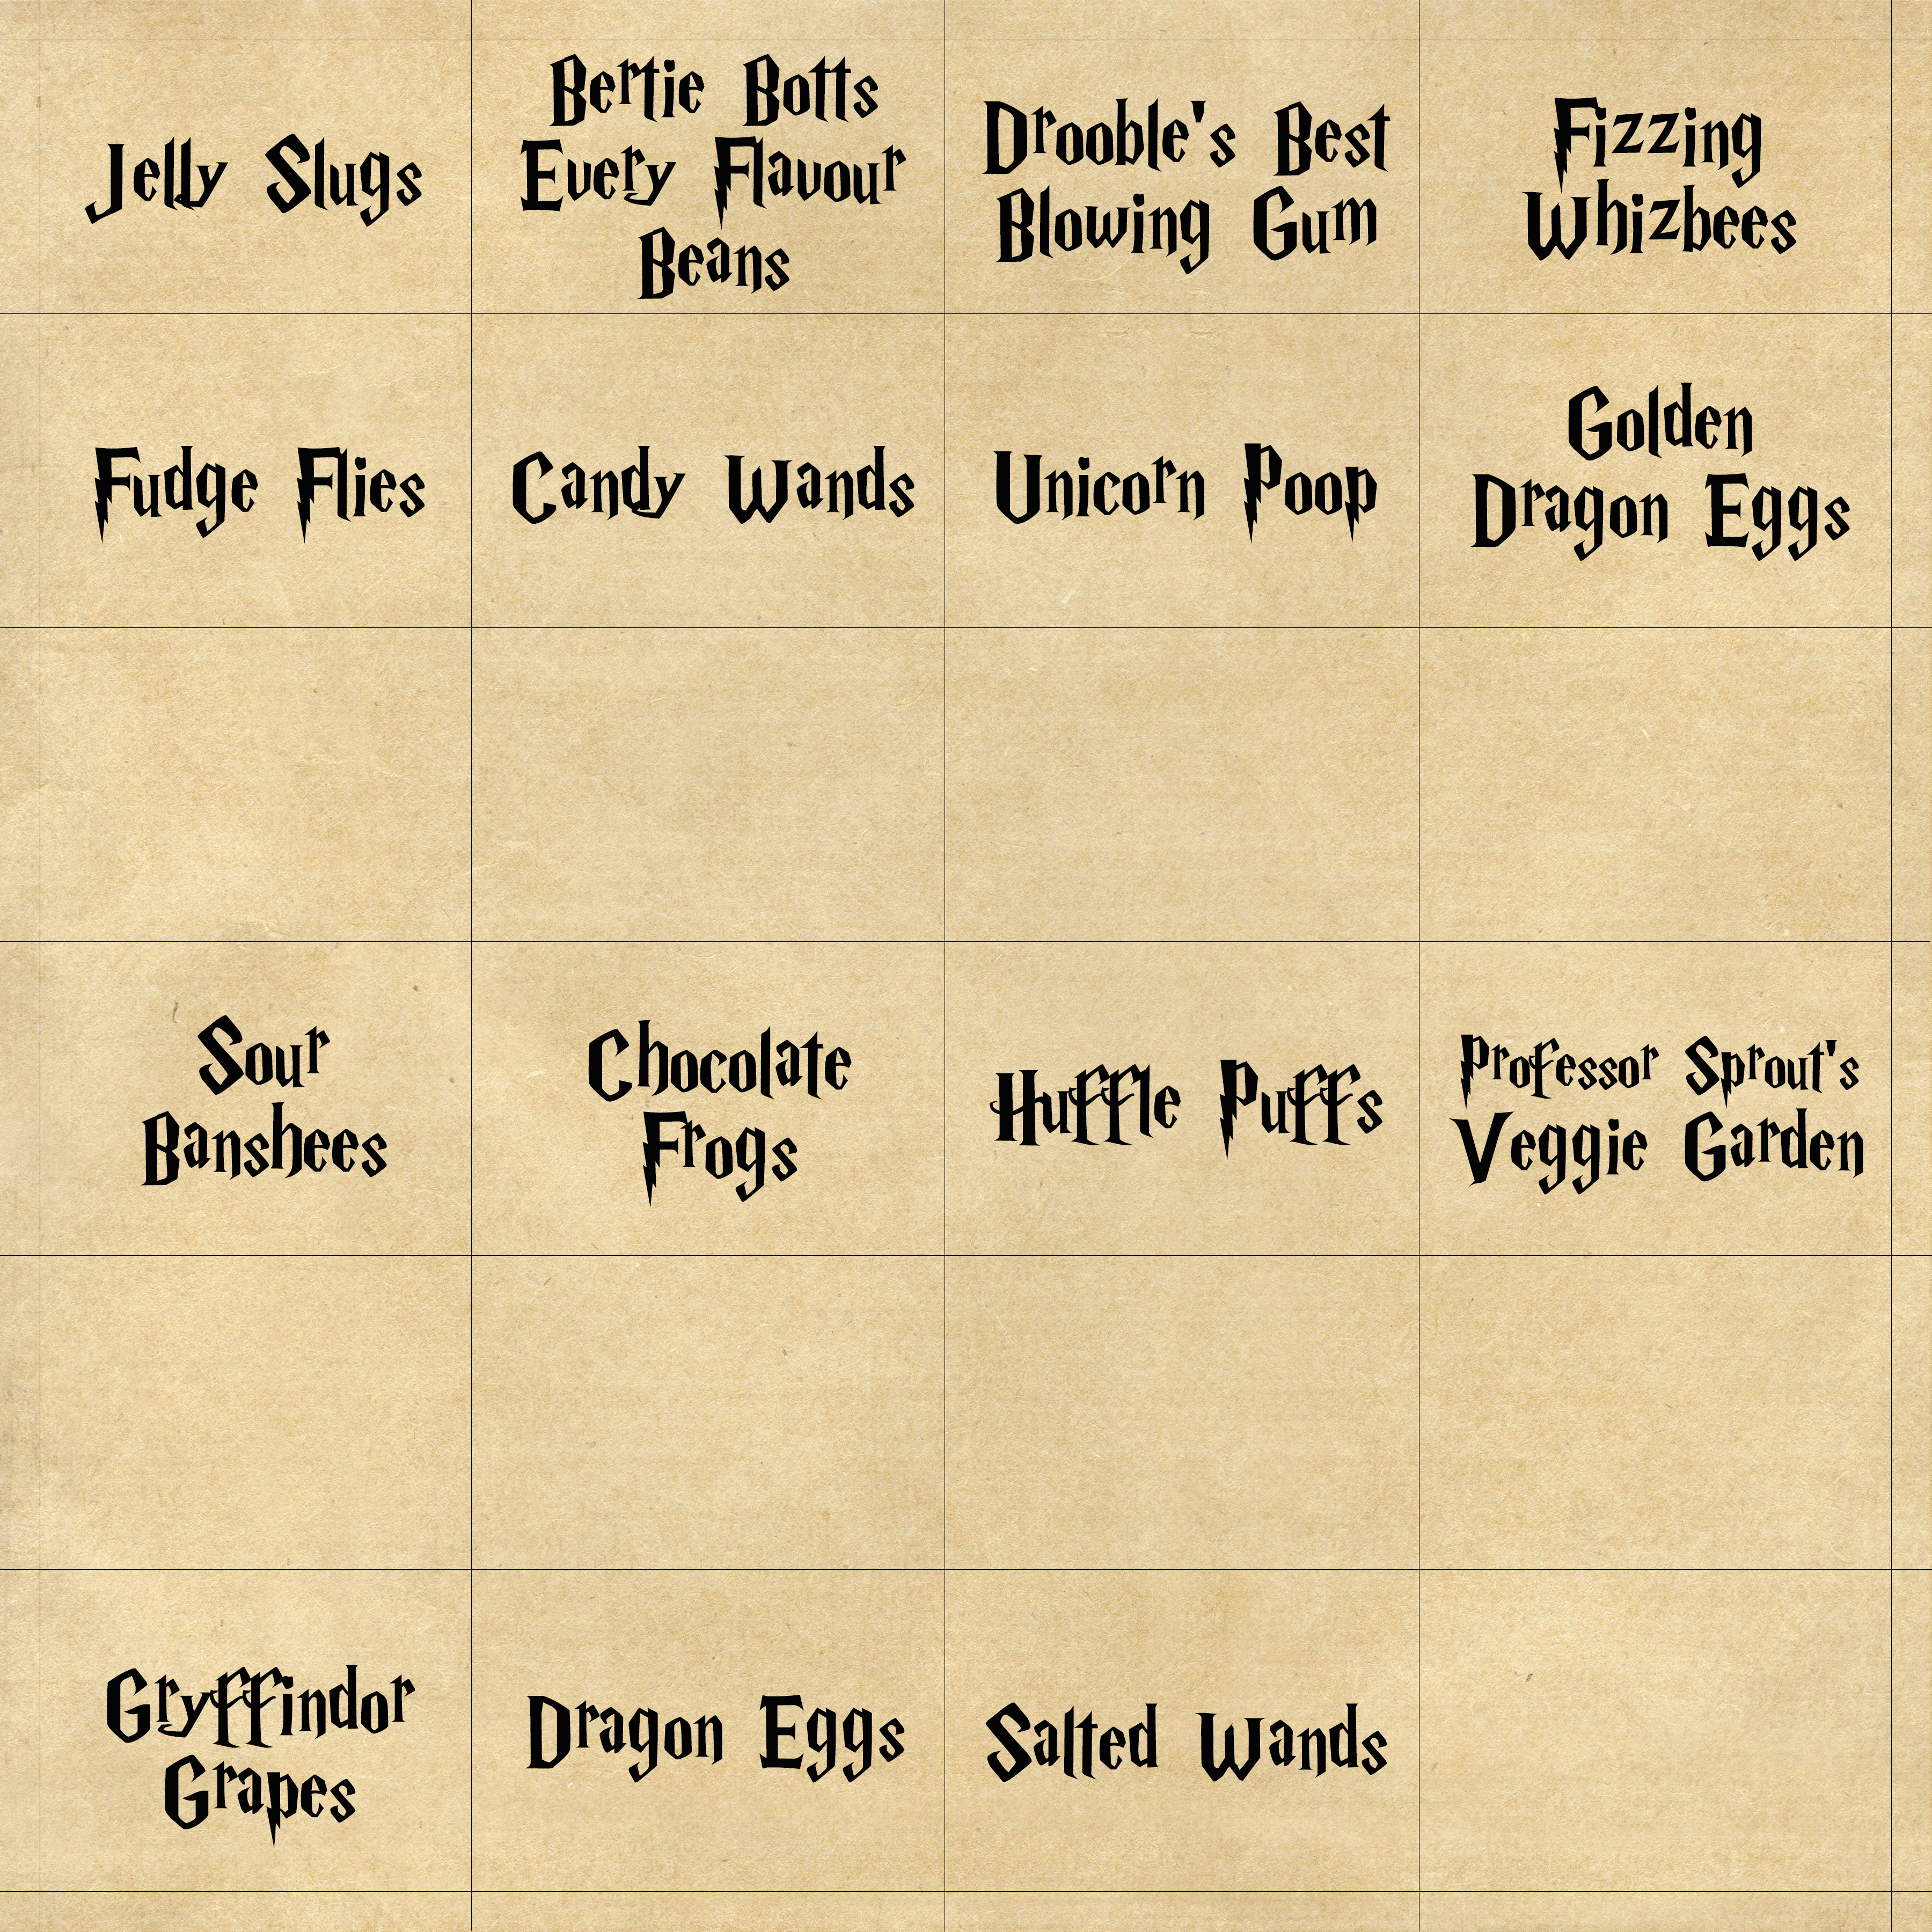
Now, what’s a party without FOOD! Zach requested a candy store display from Honeyduke’s, and I obliged. There were Jelly Slugs (sour gummy worms), Drooble’s Best Blowing Gum (
gum balls), Fizzing Whizbees (Skittles), Fudge Flies (M&M’s), Candy Wands (Twizzlers), Unicorn Poop (marshmallows), Bertie Botts Every Flavour Beans (Jelly Belly jelly beans), Golden Dragon Eggs (chocolate Easter eggs wrapped in gold foil), Sour Banshees (Sour Patch Kids), and Chocolate Frogs (handmade!). You could certainly add some chocolate
Snitches like I made for Valentine’s Day! Oh, and there were some sprinkles and edible lightning bolts I’d picked up on clearance at Michael’s, as Zach wanted decorate-your-own-cupcakes in lieu of a birthday cake. So we let the kids have at the candy store for their cupcakes.
The chocolate frogs were actually pretty easy to make. I bought a
frog mold off Amazonand simply melted some chocolate and poured it into the mold to harden. I did have some edible glitter stars I sprinkled on the frog mold first, but that step is completely optional. I had big intentions of trying to make the cool chocolate frog boxes (there are plenty of printables and tutorials on Pinterest for them), but I just ran out of time and energy!
Yes, we had A LOT of candy! But we did have some “real” food, too. There were Huffle Puffs (Pirate’s Booty cheese puffs), Salted Wands (pretzel sticks), Professor Sprouts Veggie Garden (veggie tray), and Gryffindor Grapes. We also had pizza for dinner. (No, I did not come up with a clever name for the pizza!)
{Download a FREE printable of the signs I made for the candy bar by clicking on the picture; then right click to save to your desktop}.
THE GAMES
Our party started at the ice skating rink early in the afternoon, so we had several hours before this group of boys would go to bed. To fill the time (and not destroy my house) we came up with Harry Potter themed minute-to-win-it style games! It was so much fun to put together and play!
Our first game was TABLE TOP QUIDDITCH. Think beer pong, but for kids! LOL! But it had an extra twist. You got a point for bouncing a ping pong ball (which we colored to look like Golden Snitches) into a cup. (I found these kind of gold-ish colored ping pong balls and used my black Sharpie to cover up the “P” logo with a Snitch wing.) You also got a point for bouncing it through one of the quidditch hoops. And you got 5 points if you managed to get it through a hoop AND into a cup! (Only one kid managed to do that!)
To make the quidditch hoops, here’s what you need:
First, put some sand in your clean and dry bottles. Insert a dowel into each. The hoops should be 3 slightly different heights, so you can put the first dowel all the way to the bottom of the bottle and hot glue it in place. You’ll have to do a couple layers of hot glue to fill the gap. Do the same for the other bottles; just don’t push them all the way down. Once the glue is dry, take them outside and spray paint them gold!
Little tip… I originally planned to have quidditch set up on a folding table with a green plastic tablecloth (to look like the grassy field they play on). Thankfully we tested it out before the party started because the table absorbed all the bounce from the balls! So we ended up just setting it up on the dining room table and it worked perfectly!
To set up the game, place ten solo cups in a pyramid shape – 4 at the edge of the table, 3 in front of those, then 2, then 1. Place the 3 quidditch hoops in the center of the table with the tallest in the middle.
To play the game, the kids worked in pairs but everyone had a turn bouncing their balls into the cups. The quidditch player stood on the opposite end of the table from the cups. Their partner stood behind the cups and was responsible for returning the balls back across the table (we only had 6 balls; if you happen to have a whole bucket of ping pong balls, that might make this easier, but half the fun was the kids laughing at themselves trying to retrieve balls that were bouncing all over the place!) I set a timer for one minute and everyone helped keep score as balls went through hoops and landed in cups. We kept track of the scores on a chalkboard, but you can jot them down on paper or however you’d like.
Next up was a Spells lesson: practicing
WINGARDIUM LEVIOSA. This was my favorite game! All you need are wands and
glow necklaces. Now, we made wands for everyone, but you could also buy
party wands at your local party store or online. I’ll show you how we made the wands in a moment. But first, here’s how we played the game.
First, the kids had to choose their wand. Or, should I say, the wand had to choose the wizard! My son made this adorable box for Ollivander’s. We put all the wands inside the box and everyone had to blindly reach in and grab the wand that felt “right” to them!
Again, working with the same partner, stand about ten feet apart. It might be a good idea to mark the spots with tape on the floor. We had one stand behind an ottoman and the other at the edge of a carpet. One person will be throwing the necklaces and the other will be catching them on their wands. I had a pack of 20 glow necklaces. Turns out that wasn’t enough! Two of our teams went through almost all 20 necklaces TWICE in one minute! You can buy larger packs of glow necklaces on Amazon, but if you already have some it was just as easy for the catcher to simply hand the necklaces back to the thrower. Have the kids then switch roles so the thrower now catches and the catcher now throws. For an added level of difficulty, turn off the lights! The points each person earned this round was how many hoops they were able to catch on their wand in one minute.
To make your own wands it’s actually not that hard and it was SO much fun! We followed a tutorial from
Red Ted Art. I loved that they incorporated nature elements into the wands. We have collected many shells and rocks over the years, so we used some of those, as well as some beads from my stash. Here’s what you need:
-
Chopsticks (great excuse to get some take-out! But they’re also super cheap online!)
- Rocks, shells, beads, etc. to be the focal point at the end of the wand
- Hot glue (lots and lots of hot glue!)
- Acrylic paint and brushes
To make the wands, use hot glue to glue your rock, shell or bead to the wider end of the chopstick. You’ll have to be patient at first, holding it in place while the glue dries. Then you’re going to build up the glue all around the rock to support it, but also to create a nice tapered shape to your wand. You’re going to go REALLY thick (in layers so each layer has time to dry) to fill in the gap, keeping in mind that the texture you create with the glue will become the final design of your wand. We played with different
techniques and had a lot of fun with these! I loved making swirls down the wand and giving it texture. Once the glue is completely dry, you can paint them with acrylic paint. We mixed some different shades of brown and did fun accents in gold. I just love them!!!
Our next game was one I was not about to participate in, but created lots of laughs! BERTIE BOTTS EVERY FLAVOUR BEAN.
You can buy a game made by Jelly Belly called
Bean Boozled. It has a mix of good flavors like strawberry banana smoothie and coconut, but the catch is those exact same colored jelly beans are also dead fish and spoiled milk flavors and you don’t know which one you’re eating! OMG! So gross!!! But what ten year old boy doesn’t love gross?! LOL! When we played this game, we kept a tally of how many jelly beans each person chose to eat. To get the point they had to swallow it! But if they wanted to spit it out, they could. We certainly didn’t force anyone and some boys were way more adventurous than others. I had zero points this round! HA!
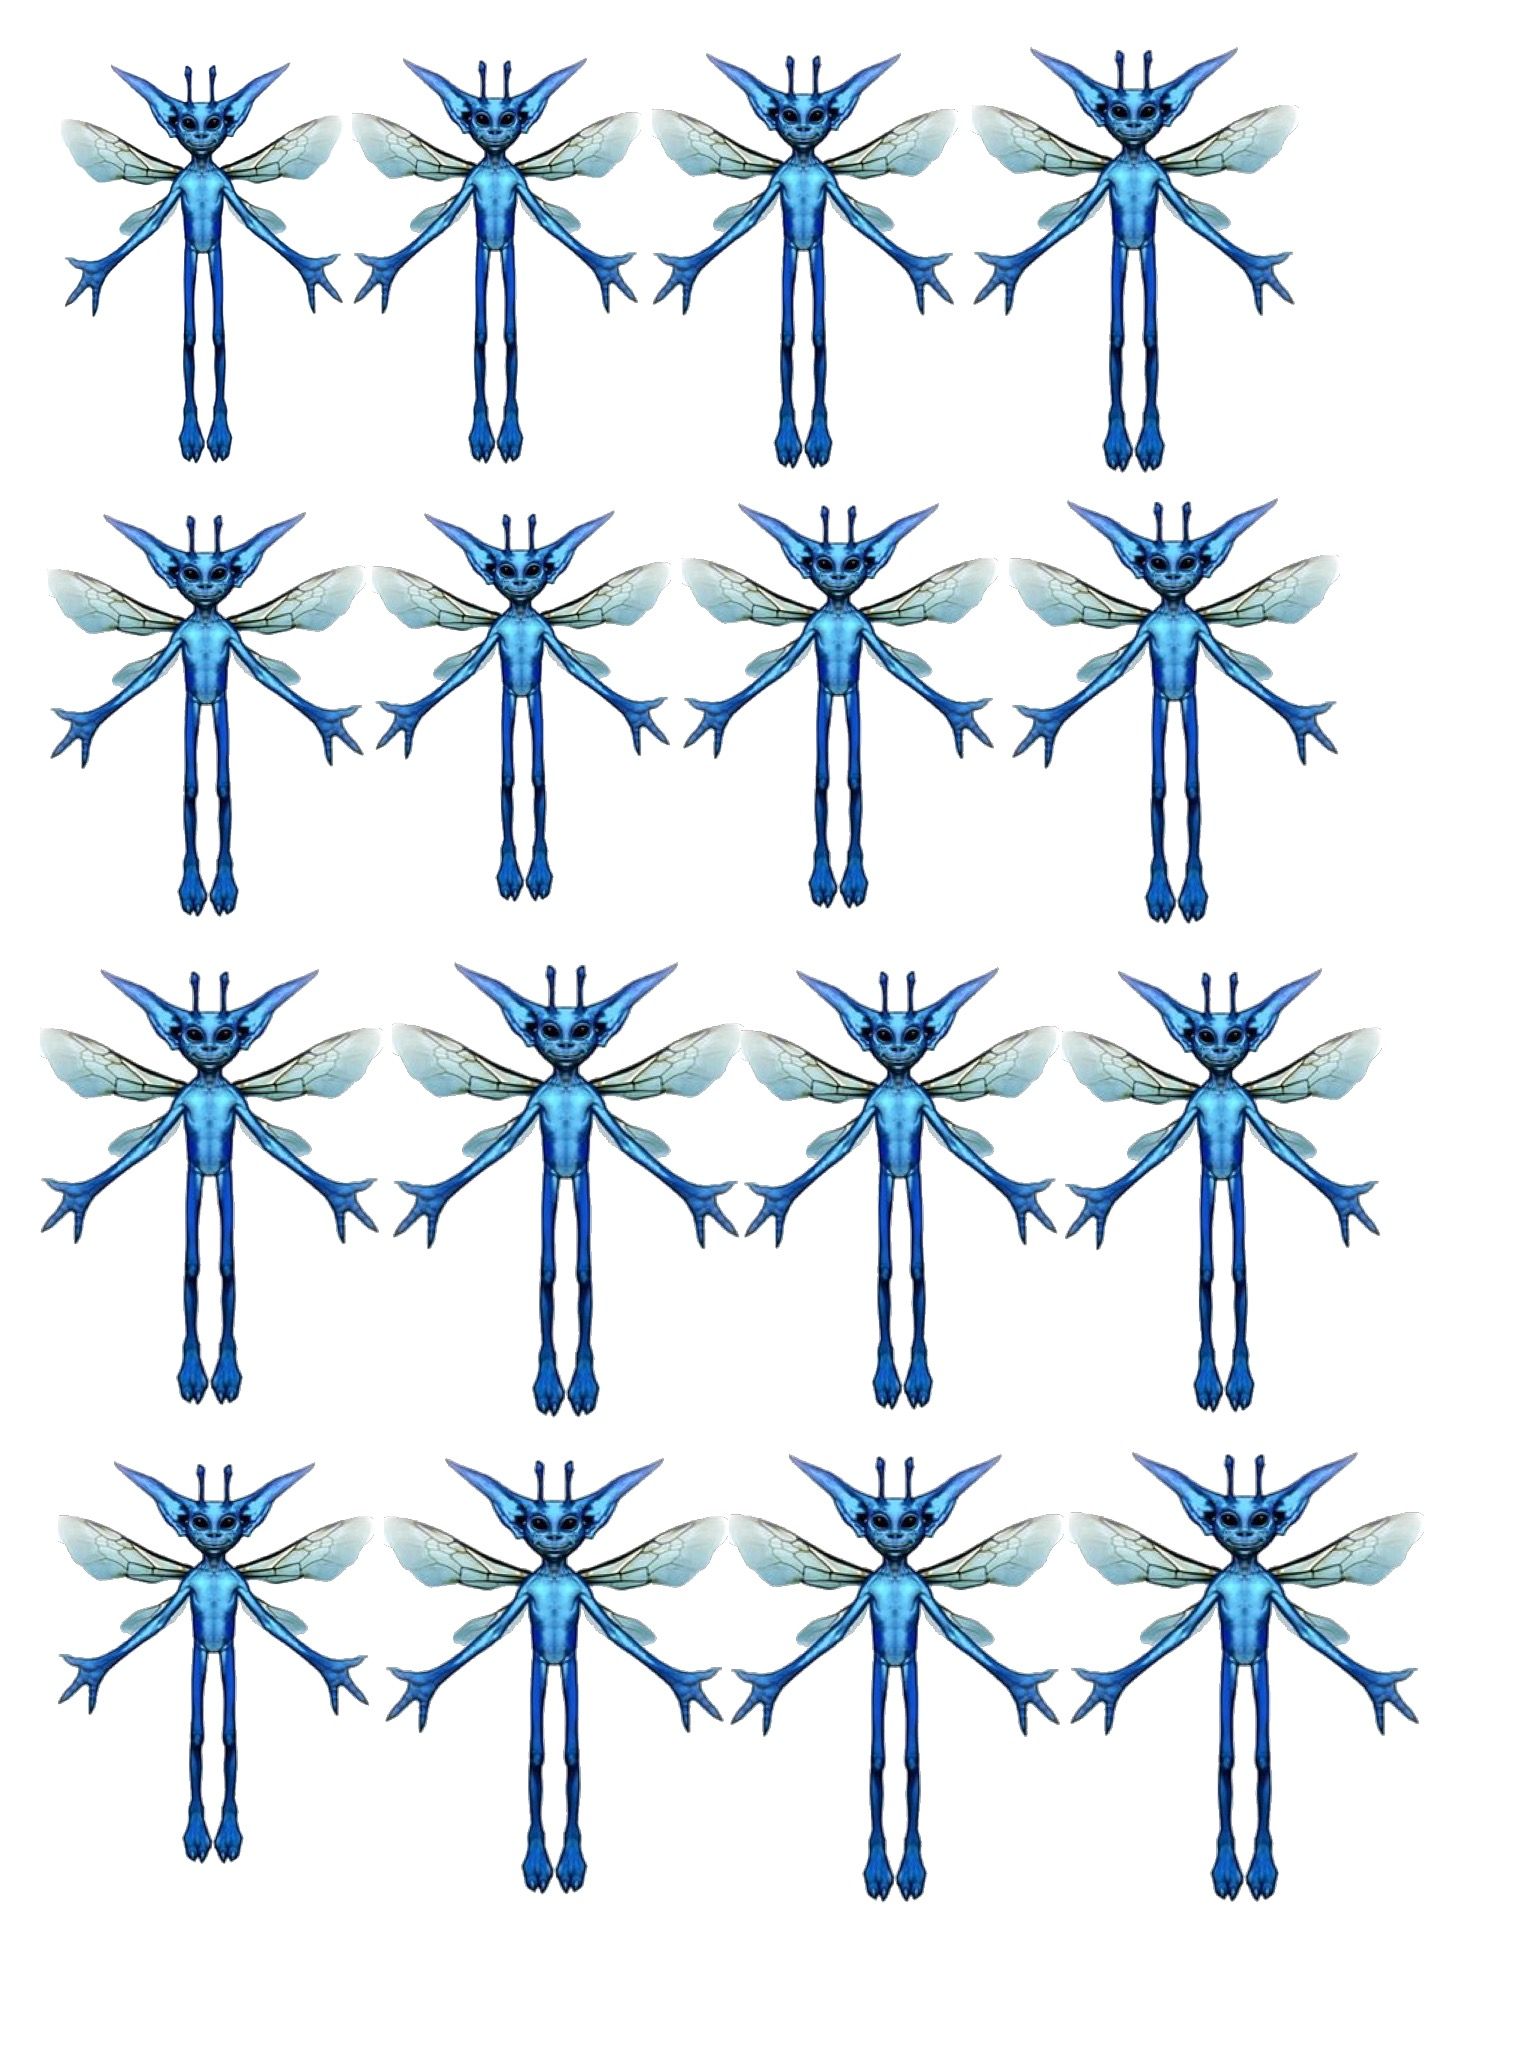
For the next game,
DEFENSE AGAINST THE DARK ARTS: GATHERING PIXIES, I sent the boys upstairs to play for a few minutes. I found an image of pixies on Pinterest and simply cut them out and hid them around the room, some in clear sight and others a bit harder. I forget how many I had total, but make sure you have enough for each child to find at least a few. I had the kids all come down and timed them one minute to find and collect as many pixies as they could.
For
WHOSE OWL FLIES THE FARTHEST, we made paper airplanes that looked like owls! I found a
tutorial online and printed out copies of the owl design in advance of the party. We all folded our owls together, step by step. Then we stood in the hallway and each launched our owl. There were 6 of us playing, so the person whose owl flew the farthest got 6 points, and the one whose didn’t take off (or went backwards, LOL!) got 1 point. You could do multiple rounds of this game if you want! I think my kids could spend an entire day playing with paper airplanes.
GET THE OWLS TO THE OWLRY was a really fun game. For this one, we had to use our wands again. You also need some
white balloons (no helium),
black Sharpies and a cage of some sort. Our boys have a massive amount of stuffed animals, and I found these huge metal baskets at Homegoods years ago for them to keep them all in. It made the perfect owl cage! I didn’t prep much for this game in advance. I had each boy blow up their own balloon and decorate their owl however they wanted. Some were tiny baby owls and some were full grown. We then placed all the owls on the floor. Working in partners, they had to use ONLY their wands (no hands or body parts) to get all the owls into the owlry (basket). I thought they would simply use their wands together to lift each balloon, but most of them ended up bouncing the balloons on their wands and into the basket. It was a lot of fun! Their point tally was how many owls they could get to land in the basket in one minute.
Our last two games were simple board games:
Harry Potter Clue and
Tri Wizard Maze. We simply LOVE Harry Potter Clue. I grew up playing the traditional Clue – Colonial Mustard in the Library with the Lead Pipe! I was skeptical about a new version of such a classic. But this Clue has a fun twist with dark magic cards and spinners on the board that open and close doorways.
The
Tri Wizard Maze is an updated version of the old popping dice game. To be honest, I didn’t play this one with the kids, so I can’t say how they changed it for Harry Potter (I was exhausted by this point!), but the boys all seemed to enjoy it! For both these games, we just gave the winner 5 points to their total score. I was keeping track of their scores on a chalkboard that got erased before I was able to take a picture! But in my house, everyone is a winner! Prizes for all! Granted, I only had 5 kids, but I got $5 Target gift cards for everyone as a prize and the grand prize winner got $10. Still WAY cheaper than a big party at one of those bounce places! With Zach’s birthday being so close to Easter, I got
large Easter eggs, called them dragon eggs and put the gift cards inside. Each kid also got to go home with their new wand.
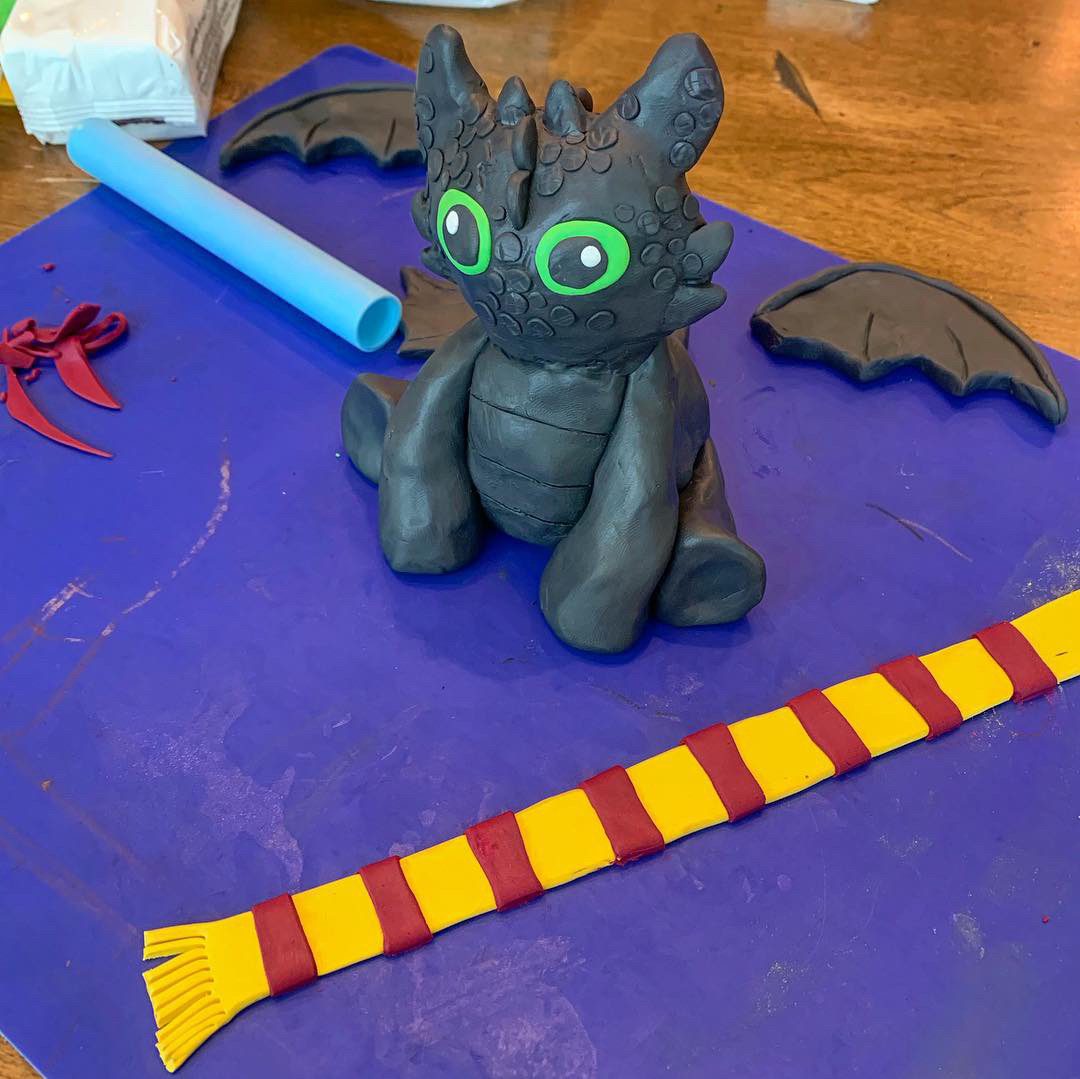
The boys stayed up WAY past my bedtime, but they had a blast. The next day we had a family celebration for Zach’s 10th birthday, and I had a handmade surprise for him! I saw this idea on Pinterest of combining Toothless from How To Train Your Dragon with Harry Potter and the idea was too adorable! I made him a cake topper out of polymer clay that he could then keep as a little statue for years. I admit, I surprised even myself with this one, as I have very little experience working with polymer clay. Turns out I need to play with it more often!
It was definitely an epic 10th birthday.


This post contains affiliate links. At no cost to you, if you click on these links and make a purchase I may be compensated.